In Google Ads, there’s an option to turn on a feature called enhanced conversions.
This feature can help improve conversion tracking accuracy. It does this by helping to recover conversions that otherwise wouldn’t have been measured, and is privacy-safe with the hashing of first-party customer data.
Hashing data converts your collected first-party data into a randomly generated series of numbers and letters. This is a method of cryptographic security. Doing this prevents privacy from being compromised, so it’s a great option to implement as third-party cookies become a thing of the past.
Read more about Google phasing out third-party cookies
This feature also allows for improved bidding optimization through better data and allows you to attribute ad clicks to offline conversions.
Once the feature is turned on, the following will happen:
After a user clicks on your ad and is directed to your landing page, they then browse as normal.
If the user is signed into their Google account before clicking on your ad, their email will be hashed. Otherwise, their email will be hashed after they’ve gone through the checkout process and input their email.
When this happens, your website will send Google hashed lead information that you specify. You then store this lead information in your CRM database.
When this lead converts, you upload the hashed lead information. From there, Google matches the hashed information back to the ad that initially drove the lead to convert.
Go to the conversion action that your account is using on Google Ads.
From the details tab, you’ll see a section titled enhanced conversions. Tick the box to turn the feature on.
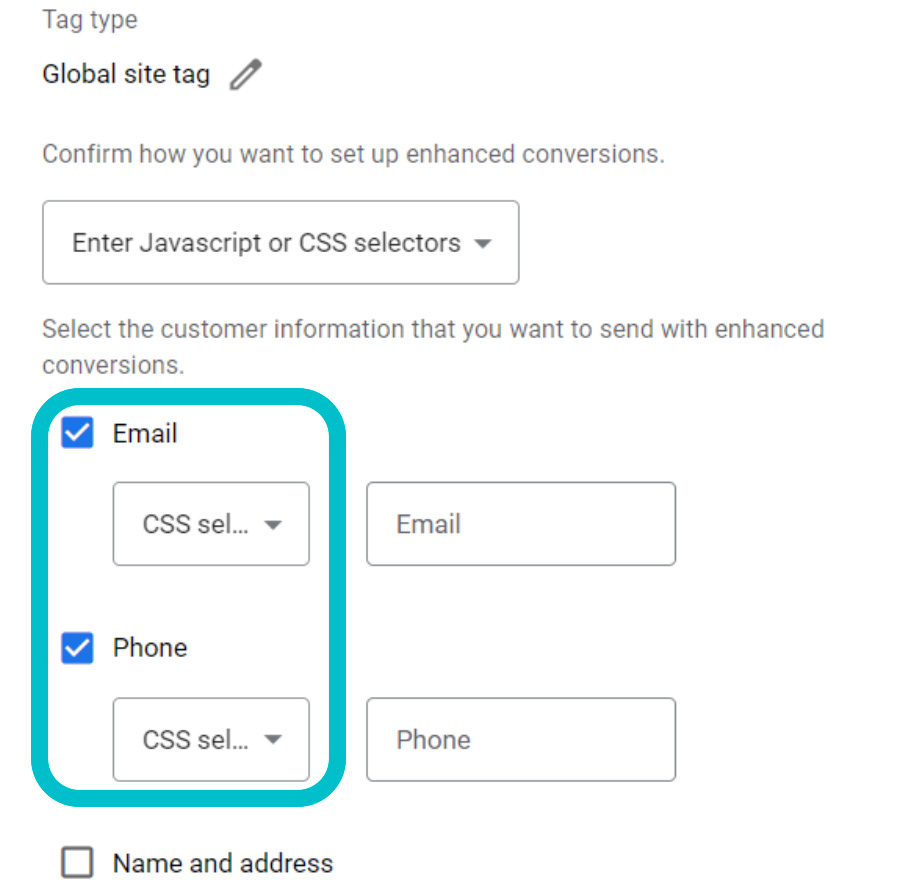
You’ll then want to tick the box next to Global site tag or Google Tag Manager.
You may then be asked to choose from different tags. In this case, select the Global site tag.
Select email and phone and make sure you select the CSS selector.
Next, go to your website, add a product to your cart, and go to the checkout page.
You’ll then want to follow these steps:
1. Right-click on the email field and select inspect from the drop-down menu that appears.
2. On the right, you’ll be shown the CSS code for the page and the email field should be highlighted.
3. Right-click the highlighted section and click copy and then copy selector.
Go back to Google Ads and paste the selector into the email section.
Finally, repeat these steps for the phone field before saving.
You’ve now successfully enabled enhanced conversions!
Check out some of our other Merchant Center guides:
• Things to keep in mind when changing your Merchant Center feed
• How to target search terms in Google Shopping campaigns
• On-sale custom labels can help get your products in front of deal-seekers
More from Bidnamic
Bid more efficiently with our proprietary
technology and convert purchase intent into sales.